Today I'm sharing with you a simple craft and decorating project that could be adapted in so many ways! The scrap fabric swags I made for the backs of my kitchen and dining room chairs were so easy, and I really love the way they add some softness to the dark colors and hard wood.
I began by picking up some fabric at Walmart. My local Walmart in Tallassee still has fabric, so I grabbed these while shopping one day.
I got a yard of each of them, except the top piece which had about 1 1/2 yards. I bought it to use as a table topper one day because I liked the texture. It was not used in this project.
I chose two light colors (polyester lace and white with gold print), two medium colors (the green burlap and green chintz cotton) and two dark colors (solid gold and rust and gold print). The textures are also varied which makes it more interesting.
The piece for the topper was $7.50, so subtract that out and I have about $16 in this project. Considering I got 12 swags for my chairs and one for my mirror, that's not bad at all! And I still had some left.
The fabrics are a standard 44/45" bolt, so I began by cutting down the middle (where it was folded in half). No need to iron or be too picky with cuts. This is supposed to look casual.
Now that I had two pieces that were about 22" wide, I turned the fabric to where the selvage was facing me. (The selvage is the outside edge where the fabric has been bound or finished off to keep it from raveling. There is one on each side of the fabric.)
Next I made small cuts - about 1/2" deep (enough to cut through the selvage) - about every inch across the width of the fabric. Again, no need to measure.
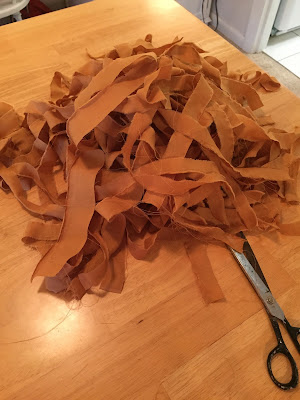
Once that was done, I simply "tore" the strips apart. Cotton fabric (and some poly) will tear easily and pretty straight. Tearing it adds to the frayed look, which is what I wanted.
You can see that the strips vary a little in width. That's fine! I didn't want it to look too perfect or like it was made by a machine.
On this print, I cut the selvage edge off because it had wording printed on it. It probably would have been fine, but I didn't want it to stand out.
The four cotton prints were easily cut and torn.
OK - here's my photo fail for the day! I thought I took pictures of me cutting the poly lace and the burlap, but I can't find them anywhere. Anyway - it was easy. I just used my rotary cutter and mat. If you don't have one, you can just cut the strips using your scissors. But they can't be torn.
I laid the piles of strips on my table in a predetermined order so I could just pick up the strips as i worked without worrying about having two lights together, etc.
I also tied the twine onto my chairs and mirror first so I would know how long to make the swags. Allow a little drape in the twine, but not much. The subtle weight of the strips will cause it to dip a little on its own.
When you are ready to tie them on, fold the strip in half, leaving a large loop at the top. If your fabric has a print, be sure to fold it right side out.
Lay the loop ON TOP of the twine and place your fingers BETWEEN the loop and twine and pull the tails through.
Gently pull on the tails to tighten like you would a man's tie.
Straighten it and slide it next to the other strips. I am right-handed and after several tries, I figured out it was easier for me to work right to left.
That's it! I love how these look. Shabby chic and perfect. If you're not crazy about the frayed look, you could use ribbon for a more tailored look.
I will be taking these down for the holidays, but they will be back up next Fall - if not sooner!
Tomorrow I'll show you how I treated my grandmother's antique mirror above.
I'm so glad you stopped by my neck of the woods!
Please take a moment to sign up to receive new posts by email.
I wouldn't want you to miss one crazy thing...


No comments:
Post a Comment